Friday, January 13, 2012

Iphone applications Make Money,Interested?

http://aupwrblg74.devsecrets.hop.clickbank.net/?noautoplay

http://appdevsecrets.com/affiliates/Whats_Inside.avi


How To Start Marketing Your Iphone App Ideas

So what will you learn from our book?http://93cb785cyjriszk13dfnj-nbsw.hop.clickbank.net/
  • How to apply our App Creation Process from idea to submission to the App Store
  • How to setup an App Business to manage your affairs
  • How to get into the App Store without a business if you choose to do so
  • The right tools and resources which you’ll need to create Apps
  • How to figure out the Apple Software Development Kit without any programming skills
  • How to pick the right audience for your App
  • How to sketch out your idea and create specs that you can send to an expert developer
  • How to hire and manage an expert development team
  • How to install and test your App so it’s just the way you want it
  • How to submit your App and get it approved by Apple
  • How to market your App after it gets approved

Think you’ve got the next Great iPhone App idea?


We can show you how to get it made without any programming experience at all.


We can show you how can turn your iPhone app idea into a reality, without needing any programming knowledge, or buying expensive equipment and complicated software.

Find out how we built an $800,000/year business creating iPhone Apps

How to Synchronize Your iPhone with Your Computer

Synchronizing your iPhone with your computer is a lot like syncing an iPod with your computer. If you’re an iPod user, the process will be a piece of cake. But it’s not too difficult even for those who’ve never used an iPod.
1

Start by connecting your iPhone to your computer with the USB cable that came with your iPhone.

When you connect your iPhone to your computer, iTunes should launch automatically. If it doesn’t, chances are you plugged the cable into a USB port on your keyboard, monitor, or hub. Try plugging it into one of the USB ports on your computer instead.
2

Select your iPhone in the iTunes source list.

You see the Set Up Your iPhone pane, as shown here.
3

Name your iPhone.

This figure shows the name Lisa’s iPhone.
4

Decide whether you want iTunes to automatically synchronize your iPhone and your contacts, calendars, e-mail accounts, and bookmarks.

If that’s what you want, click the check box next to Automatically Sync Contact, Calendars, Email Accounts, and Bookmarks to make a check mark appear. Then click the Done button.
If you want to synchronize manually, make sure the check box is unchecked and click Done.
After you click the Done button, the Summary pane should appear. If it doesn’t, make sure your iPhone is still selected in the source list and click the Summary tab near the top of the window, as shown here.
5

If you want iTunes to sync your iPhone automatically whenever you connect it to your computer, select the Automatically Sync When This iPhone Is Connected check box (in the Options area).

Don’t select it if you want to sync manually by clicking the Sync button at the bottom of the window.
6

If you want to sync only items that are selected in your iTunes library, select the Only Sync Checked Songs and Videos check box.

This limits the items that are synced.
7

If you want to turn off automatic syncing in the Music and Video panes, check the Manually Manage Music and Videos check box.

And, of course, if you decide to uncheck the Automatically Sync When This iPhone Is Connected check box, you can always synchronize manually by clicking the Sync button in the bottom-right corner of the window.
By the way, if you’ve changed any sync settings since the last time you synchronized, the Sync button will instead say Apply.

How to Add Calendar Entries on Your iPhone

Your iPhone has a calendar that lets you add personal entries. With your busy schedule, keeping your calendar entries up to date can keep you from missing those all-important appointment and to-do items straight.
1

Tap the Calendar icon at the top of the screen.

Then tap the List, Day, or Month button.
2

Tap the + button at the upper-right corner of the screen.

The + appears whether you are in List, Day, or Month view. Tapping + displays the Add Event screen, shown here.
3

Tap the Title/Location field and finger-type as much or as little information as you feel is necessary.

Tapping displays the virtual keyboard.
4

Tap Save.

This saves the entry.
5

If your calendar entry has a start time or end time (or both):

a. Tap the Starts/Ends field.
b. In the bottom half of the screen that appears (shown here), choose the time the event starts and then the time it ends. Use your finger to roll separate wheels for the date, hour, minute (in 5-minute intervals), and to specify AM or PM. It’s a little like manipulating one of those combination bicycle locks.
c. Tap Save when you are finished.
6

If you are entering a birthday or another all-day milestone, tap the All-day button so that On (rather than Off) is showing. Then tap Save.

Because the time isn’t relevant for an all-day entry, you’ll note that the bottom half of the screen now has wheels for just the month, day, and year.
7

If you are setting up a recurring entry, such as an anniversary, tap the Repeat window. Tap to indicate how often the event in question recurs, and then tap Save.

The options are Every Day, Every Week, Every 2 Weeks, Every Month, and Every Year.
8

If you want to set a reminder or alert for the entry, tap Alert. Then tap on a time, and then tap Save.

Alerts can be set to arrive on the actual date of an event, 2 days before, 1 day before, 2 hours before, 1 hour before, 30 minutes before, 15 minutes before, or 5 minutes before. At Alert time, you’ll hear a sound and see a message like the one shown here.
Are you the kind of person who needs an extra nudge? You can set another reminder by tapping on the Second Alert field.
9

Tap Calendar to assign the entry to a particular calendar and tap the calendar you have in mind (Home, Work, and so on).

Tap Save.
10

If you want to enter notes about the appointment or event, tap Notes. Type your note, and then tap Save.

A virtual keyboard pops up so that you can type in those notes.
11

Tap Done.

This indicates that you have finished entering everything.

How to Get Walking Directions with the iPhone Maps App

The iPhone Maps app can help you get from here to there, whether you're walking, driving, or using public transportation. If you're ready to stretch your legs, follow these instructions for finding walking directions on your iPhone.
1

Tap the Directions button at the bottom of the map screen.

The Start and End fields appear at the top of the screen.
2

Type the start and end points.

Alternatively, select them from your bookmarks, recent maps, or contacts, if you prefer. Weird but true: If you type the end location, you’ll have to tap the Route button before you can perform the next step; but if you select the end location from your Bookmarks, Contacts, or Recents list, the Route button doesn’t appear and thus doesn’t need to be tapped before you perform the next step.
3

If you want to swap the starting and ending locations, tap the little swirly arrow button to the left of the Start and End fields.

This nifty feature can help you find your way back.
4

When the start and end locations are correct, tap the Route button in the bottom-right corner of the screen.

The route map appears. If you need to change the start or end location, tap the Edit button in the top-left corner and type a new start or end location in the appropriate field. The screen that appears has three icons near the top: a car, a bus, and a person walking. Directions by car is the default.
5

For step-by-step walking directions, tap the person-walking icon.

Walking directions generally look a lot like driving directions, except for your travel time.

How to Activate Siri on Your iPhone 4S


3 of 9 in Series: The Essentials of New Features of the iPhone 4S
When you first set up the iPhone 4S, you have the option of turning on Siri. If you did so, you’re good to go. If you didn’t, tap Setting→General→Siri and flip the switch so that On is showing. (If you do turn Siri off on the 4S, it effectively turns Voice Control on.)
To call Siri into action, press and hold the Home button until you hear a tone and then start talking. The bottom of the screen shows a picture of a microphone inside a circle:
image0.png The question, “What can I help you with?” appears on the screen.
Alternatively, when the screen isn’t locked, bring the phone up to your ear and wait for that same tone, and then talk. Siri also responds when you press a button on a Bluetooth headset. If you’re concerned about Siri intruding when you raise the phone up to your ear to make a call, head to Settings to turn the Raise to Speak feature off.
What happens next is up to you. You can ask a wide range of questions or issue voice commands. If you didn’t get your words out fast enough or you were misunderstood, tap the microphone icon and try again.
Siri relies on voice recognition and artificial intelligence. She’ll respond in a conversational (if slightly robotic) manner. But using Siri isn’t entirely a hands-free experience. Spoken words are supplemented by information on the iPhone screen.
Siri seeks answers from the web using sources such as Yelp and WolframAlpha. She taps into Location Services on the phone. And Siri works with numerous apps on the 4S: Phone, Mail, Safari, Music, Messages, Calendar, Reminders, Maps, Weather, Stocks, Notes, Clock, and Contacts.
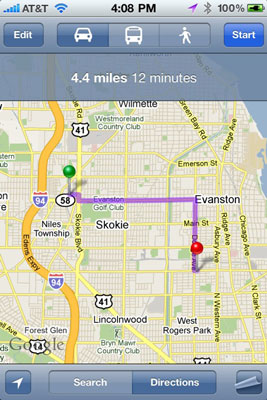
Indeed, from your contacts, Siri might be able to determine who your spouse, coworkers, and friends are, as well as knowing where you live. You might ask, “How do I get home from here?” and Siri will fire up Maps to help you on your way. Or you can ask, “Find a good Italian restaurant near Barbara’s house,” and Siri will serve up a list, sorted by Yelp rating.
Siri requires Internet access. A lot of factors go into its accuracy, including surrounding noises and unfamiliar accents.

FaceTime Features on Your iPhone 4S

FaceTime Features on Your iPhone 4S

2 of 9 in Series: The Essentials of New Features of the iPhone 4S
FaceTime, Apple’s video calling feature, puts your iPhone 4S in a whole different class when it comes to making phone calls. Plus, FaceTime comes with at least two major benefits, besides the video (which is typically pretty good):
  • FaceTime calls don’t count against your regular minutes.
  • The audio quality on FaceTime calls is superior to a regular cell phone connection.
When you’re FaceTiming, you see the person you’re chatting with, but you also see your own face in a small picture-in-picture (PiP) window, which you can drag to a corner of the screen:
image0.jpg The PiP image represents what the other person sees, so it’s a good way of knowing, short of the other person telling you, if your face has dropped out of the frame. You can use FaceTime in portrait or landscape mode. You might find it easier to bring another person into a scene in landscape mode.
Although many FaceTime calls start with a regular AT&T, Sprint, Verizon, or C Spire call, you can’t go from FaceTime to an audio-only call without hanging up and redialing. Similarly, if you drop a FaceTime call because of a Wi-Fi hiccup or some other problem, you’ll have to redial via FaceTime or your provider, depending on whether you want the call to be video or only audio.
You have choices in how (and whether) to handle a FaceTime call and what you can do while on a call:
  • Block all FaceTime calls: If you just don’t feel up to being seen while talking, tap Settings from the Home screen, tap Phone, and make sure FaceTime is off. If you can’t find the FaceTime button or wonder why you’re not getting FaceTime calls, go back into Settings and make sure this option is turned on. Although you are in FaceTime Settings, you’ll notice that you can list one or more e-mail addresses by which a caller can reach you for a video call, along with your iPhone’s phone number.
  • Decline FaceTime: Cool as it can be to see and be seen, ask yourself if you really want to be seen, say, when you just got out of bed. If you don’t, just decline the FaceTime aspect of the call.
  • Mute the audio: Tap the microphone icon with the slash running through it. The caller can continue to see you but not hear you.
  • Check out another iPhone app while on a FaceTime call: Simply press the Home button and then tap the icon for the app you have in mind. At this point, you can still talk over FaceTime, but you’ll no longer see the person. Tap the green bar at the top of the screen to bring the person back in front of you.
  • Toggle between the front and rear cameras on your iPhone 4S: Apple says the front camera has been fine-tuned for FaceTime usage, which in photography-speak means the camera has the proper field of view and focal length. But at times, you’ll want to use the iPhone’s main camera on the rear to best show off your surroundings and give the caller an idea of where you are. To toggle between the front and main cameras, tap the icon at the bottom-right corner of the screen.

Create an iPhone or Ipad App or Game in 4 weeks with No programming Skills

How YOU Can Create an iPhone or iPad App or Game in 4 weeks And Hit Pay Dirt With It In The App Store With No Programming Skills.
Let me give you some interesting statistics real quick. There are:
  • Four Billion Apps Downloaded From Apple's Appstore currently
  • Over 250 million i-gadgets sold ( I mean iphones, ipods and ipads in total)
  • For every 1 paid app there are 12 free downloaded apps which, btw, you can use as well for generating a revenue with list building and showing ads
  • There are over 250,000 approved apps in the apple storeLet me ask you this.
    Why is it so great to have your own app or game? There are two different ways to go when having your own App. You can either go the “pay” route when someone has to pay from 99 cents to $10 to buy your app. The other way to go is the “free” route. Most people don’t even think of making their app free but there is actually less competition and therefore you can make a ton of money.
    How?
    Let me show you something real quick. Stats have shown that if you have a free app that gets into the Top 100 downloaded apps list in the Apple store, the owner makes between $400 to $5000 per day. Yes, you heard right.
    Per day!!
    That’s a lot of money if you think about it. It obviously depends, of course, where you are in the list. That means at the least you’d be making $12,000 per month. Not too shabby for a free application.

     http://7c0c43ye6lobry98pt79fjjj2a.hop.clickbank.net/